I've used Vagrant to manage local development servers for several years. Vagrant is, according to its official website, a tool to "create and configure light-weight, reproducible, and portable development environments." Basically, Vagrant helps me create and provision virtual machines with unique combinations of software and configuration customized for each of my projects. This approach accomplishes three important things:
- Vagrant isolates project environments to avoid software conflicts.
- Vagrant provides the same software versions for each team member.
- Vagrant builds a local environment that is identical to the production environment.
However, Vagrant has one large downside—it implies hardware virtualization. This means each project runs atop a full virtual machine, and each virtual machine has a complete operating system that demands a large overhead in system resources (e.g., CPU, memory, and gigabytes of disk space). I can't tell you how often I have seen this warning message when I have too many concurrent projects:
Your startup disk is almost full.
The logical solution is to run multiple projects on a single Vagrant virtual machine. Laravel Homestead is a popular Vagrant box that uses this strategy. You lose project isolation, and you can't customize your server software stack for each project. However, you regain local system resources and have less infrastructure to install and manage. If you rely on Vagrant to manage local projects, I highly recommend the one virtual machine, many projects strategy adopted by Laravel Homestead.
There is another solution, though. Have you heard of Docker? I first heard this word a year ago. It's all about containers, I was told. Awesome. What are containers?, I thought. I dug deeper, and I read all about containerization, process isolation, and union filesystems. There were so many terms and concepts flying around that my head started spinning. At the end of the day, I was still scratching my head asking what is Docker? and how can Docker help me? I've learned a lot since then, and I want to show you how Docker has changed my life as a developer.
Hello, Docker
Docker is an umbrella term that encompasses several complementary tools. Together, these tools help you segregate an application's infrastructure into logical parts (or containers). You can piece together only the parts necessary to build a portable application infrastructure that can be migrated among development, staging, and production environments.
What is a Docker Container?
A container is a single service in a larger application. For example, assume we are building a PHP application. We need a web server (e.g., nginx). We need an application server (e.g., PHP-FPM). We also need a database server (e.g., MySQL). Our application has three distinct services: a web server, an application server, and a database server. Each of these services can be separated into its own Docker container. When all three containers are linked together, we have a complete application.
What is a Docker Image?
Separating an application into containers seems like a lot of work with little reward. Or so I thought. It's actually quite brilliant for several reasons. First, containers are actually instances of a platonic, canonical image. Imagine a Docker image as a PHP class. Just like a single PHP class can be used to instantiate many unique PHP objects, so too can Docker images be used to instantiate many unique Docker containers. For example, we can reuse a single PHP-FPM Docker image to instantiate many unique PHP-FPM containers for each of our applications.
Although we can build custom Docker images, it's easier to find and share Docker images on Docker Hub. For example, we could download and use the sameersbn/mysql Docker image to create MySQL database containers for our application. Why re-invent the wheel if someone has already built a Docker image that solves our problem?
How is Docker Different from Vagrant?
How is Docker better than Vagrant if we are running multiple containers for each project? Isn't this worse than running a virtual machine with Vagrant? No, and here's why.
Docker Images Are Extendable
Docker images further resemble PHP classes because they extend parent images. For example, an Nginx Docker image might extend the phusion/baseimage Docker image, and the phusion/baseimage image extends the top-most ubuntu Docker image. Each child image includes only the content that is different from its parent image. This means the top-most ubuntu image contains only a minimal Ubuntu operating system; the phusion/baseimage image includes only tools that improve Docker container maintenance and operation; and the Nginx image includes only the Nginx web server and configuration.
Unrelated Docker images may extend the same ancestor image, too. This practice is actually encouraged because Docker images are downloaded only once. For example, if an Nginx and a PHP-FPM image both extend the same ubuntu:14.04 Docker image, we download the common Ubuntu image only once.
Docker Containers Are Lightweight
Docker containers are lightweight and require a nominal amount of local system resources to run. In fact, once you download the necessary Docker images, instantiating a Docker image into a running Docker container takes a matter of seconds. Compare that to your first vagrant up --provision command that often requires 15-30 minutes to create and provision a complete virtual machine. This efficiency is possible for two reasons. First, each Docker container is just a sandboxed system process that does only one thing. Second, all Docker containers run on top of a shared Docker host machine—either your host Linux operating system or a miniscule Linux virtual machine.
Docker containers are also ephemeral and expendable. You should be able to destroy and replace a Docker container without affecting the larger application.
If containers are ephemeral, how do we store persistent application data? I asked the same question. We persist application data on the Docker host via Docker container volumes. We'll discuss Docker container volumes when we instantiate MySQL containers later in this article.
Same Host, Parallel Universes
Unlike Vagrant, which requires a complete virtual machine, filesystem, and network stack for each project, Docker containers run on a single shared Docker host machine. How is this possible? Would Docker containers not collide when using the same file system and system resources? No, and this is Docker's pièce de résistance.
Docker is built on top of its own low-level Linux library called libcontainer. This tool sandboxes individual system processes and restricts their access to system resources using adapters for various Unix and Linux distributions. Docker's libcontainer library lets multiple system processes coexist on the same Docker host machine while accessing their own sandboxed filesystems and system resources.
That being said, Docker is not just libcontainer. Docker is an umbrella that encapsulates many utilities, including libcontainer, that enable Docker image and container creation, portability, versioning, and sharing.
Docker is the best of both worlds. Whereas Vagrant is a tool primarily concerned with hardware virtualization, Docker is more concerned with process isolation. Both Vagrant and Docker achieve the same goals for developers—they create environments to run applications in isolation. Docker does so with more efficiency and portability.
Let's Build an Application
Enough jibber-jabber. Let's use Docker to build a PHP application that sits behind an Nginx web server and communicates with a MySQL database. This is not a complex application by any stretch of the imagination. However, it is a golden opportunity to learn:
- How to build a Docker image
- How to instantiate Docker containers
- How to persist data with Docker volumes
- How to aggregate container log output
- How to manage related containers with Docker Compose
First, create a project directory somewhere on your computer and make this your current working directory. All commands in the remainder of this tutorial occur beneath this project directory.
Game Plan
Before we do anything, let's put together a game plan. First, we need to install Docker. Next, we need to figure out how our application will break down into individual containers. Our application is pretty simple: we have an Nginx web server, a PHP-FPM application server, and a MySQL database server. Ergo, our application needs three Docker containers instantiated from three Docker images. We'll need to figure out if we want to build the Docker images ourselves or download existing images from Docker Hub.
We should also decide on a common base image from which all of our Docker images extend. If our Docker containers all extend the same base image, we save disk space and reduce the number of Docker image dependencies. We'll use the Ubuntu 14.04 base image in this tutorial.
After we build and/or download the necessary Docker images, we'll instantiate and run our application's Docker containers with Docker Compose. If everything goes according to plan, we'll have an on-demand PHP development environment up and running in a matter of seconds with only one bash command.
...we'll have an on-demand PHP development environment up and running in a matter of seconds with only one bash command.
Finally, we'll discuss how to aggregate container log output. Remember, containers are expendable, and we should never store data on the container itself. Instead, we'll redirect logs to their respective container's standard output and standard error file descriptors so that Docker Compose can collect and manage our containers' log data in aggregate.
Install Docker
Docker requires Linux, and it supports many different Linux distributions: Ubuntu, Debian, CentOS, CRUX, Fedora, Gentoo, RedHat, and SUSE. Take your pick. Your local Linux operating system is the Docker host on which you instantiate and run Docker containers.
Many of us run Mac OS X or Windows, but we're not out of luck. There is something called Boot2Docker. This is a tool that creates a tiny Linux virtual machine, and this virtual machine becomes the Docker host instead of our local operating system. Don't worry, this virtual machine is really small and boots in about 5 seconds.
After you install Boot2Docker, you can either double-click the Boot2Docker application icon, or you can execute these bash commands in a terminal session:
boot2docker init
boot2docker up
eval "$(boot2docker shellinit)"
These three commands create the virtual machine (if it is not already created), start the virtual machine, and export the necessary environment variables so that your local operating system can communicate with the Docker host virtual machine.
If you're like me and dislike typing more than necessary, you can create a bash alias. Add this line to your ~/.bash_profile file:
alias dockup="boot2docker init && boot2docker up && eval \"\$(boot2docker shellinit)\""
This creates a bash alias named dockup (an abbreviation for the completely arbitrary phrase Docker Up). Now you can simply type dockup in a new terminal session to create, start, and initialize your Docker host virtual machine.
The Nginx Docker Image
Our first concern is the Nginx web server. I'm sure we can find a suitable image on Docker Hub that extends the Ubuntu 14.04 base image. However, this is an opportunity to build our own Docker image. Create a new directory at images/nginx/, and add Dockerfile and start.sh files in this directory. Your project directory should look like this:
images/
    nginx/
        Dockerfile
        start.sh
Open the Dockerfile file in your preferred text editor and add this content:
FROM phusion/baseimage
MAINTAINER YOUR NAME <YOUR EMAIL>

CMD ["/sbin/my_init"]

RUN apt-get update && apt-get install -y python-software-properties
RUN add-apt-repository ppa:nginx/stable
RUN apt-get update && apt-get install -y nginx

RUN echo "daemon off;" >> /etc/nginx/nginx.conf
RUN ln -sf /dev/stdout /var/log/nginx/access.log
RUN ln -sf /dev/stderr /var/log/nginx/error.log

RUN mkdir -p /etc/service/nginx
ADD start.sh /etc/service/nginx/run
RUN chmod +x /etc/service/nginx/run

EXPOSE 80

RUN apt-get clean && rm -rf /var/lib/apt/lists/* /tmp/* /var/tmp/*
The Dockerfile uses commands defined in the Docker documentation to construct a new Docker image. Let's walk through this file line-by-line and see what each command does.
Line 1 begins with FROM, and it specifies the name of the parent Docker image from which this new image extends. We extend the phusion/baseimage Docker image because it provides tools that simplify Docker container operation.
Line 2 begins with MAINTAINER, and it specifies your name and email. If you share this Docker image on Docker Hub, other developers will know who created the image and where they can ask questions.
Line 3 initiates built-in house-keeping tasks provided by the phusion/baseimage base image.
Lines 4-6 install the latest stable Nginx version from the Nginx community PPA (personal package archive). This PPA contains the latest stable Nginx build and is a quick way to install Nginx without building from source.
Lines 7-9 update the Nginx configuration file so that Nginx does not run in daemonized mode. These lines also symlink the Nginx access and error log files to the container's standard output and standard error file descriptors. We direct Nginx logs to the container's standard output and standard error file descriptors so that Docker can manage our application's log data in aggregate. We never want to persist any information on the container itself.
Lines 10-12 copy the start.sh file into the container. This file is invoked by the phusion/baseimage base image to start the Nginx server process.
Line 13 tells Docker to expose port 80 on all containers instantiated from this image. We need to expose port 80 so that inbound HTTP requests can be received by Nginx and handled appropriately.
Line 15 performs final house-keeping tasks provided by the phusion/baseimage base image.
Next, open the start.sh file and append this content:
#!/usr/bin/env bash
service nginx start
This file contains the bash commands to prepare and start the Nginx web server process. Now we're ready to build our Nginx Docker image. Navigate into the images/nginx/ project directory and execute this bash command:
docker build -t tutorial/nginx .
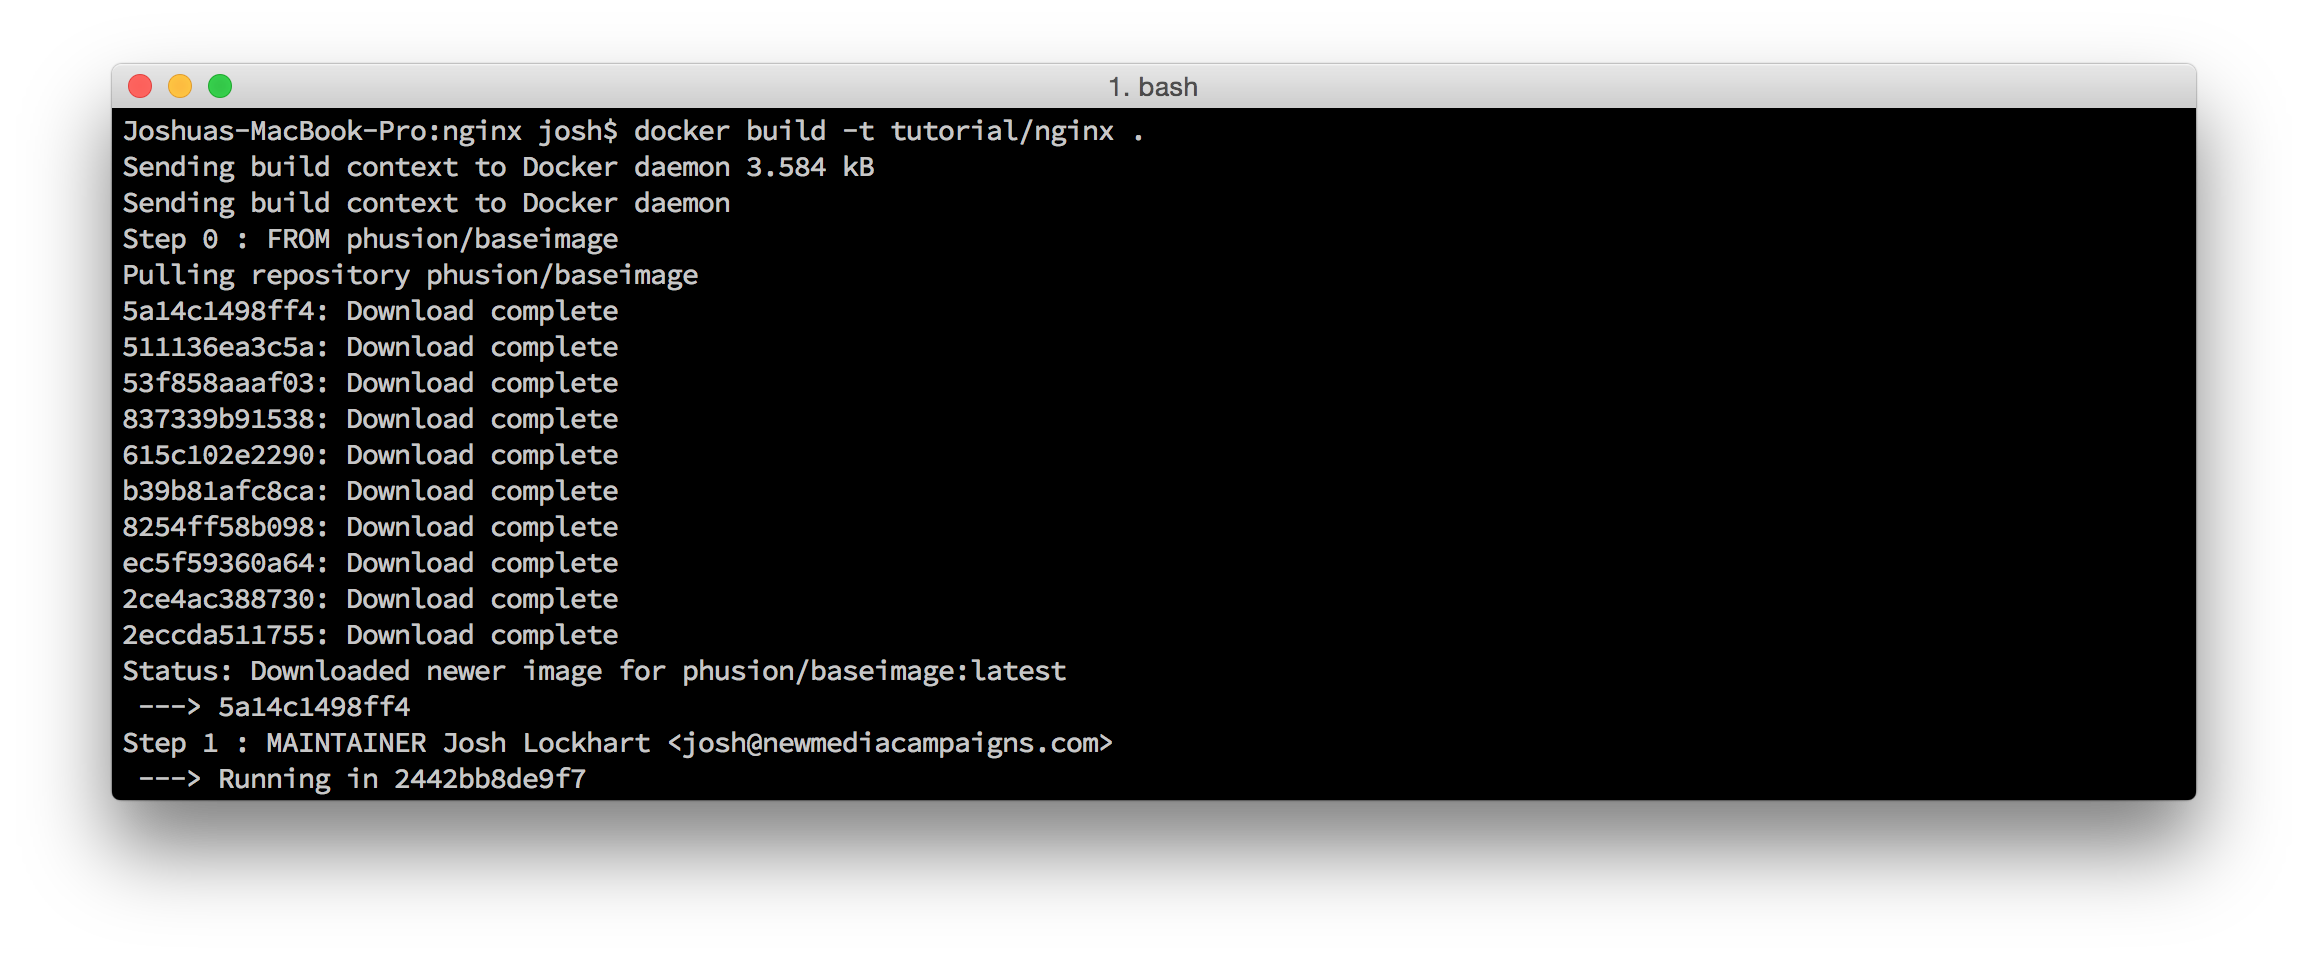 Docker build command
You'll see some output in your terminal as Docker builds your Nginx Docker image based on the commands in the Dockerfile file. You'll also notice that Docker downloads any parent image dependencies from Docker Hub. When the build completes, you can execute the docker images bash command to output a list of available Docker images. You should see tutorial/nginx in that list.
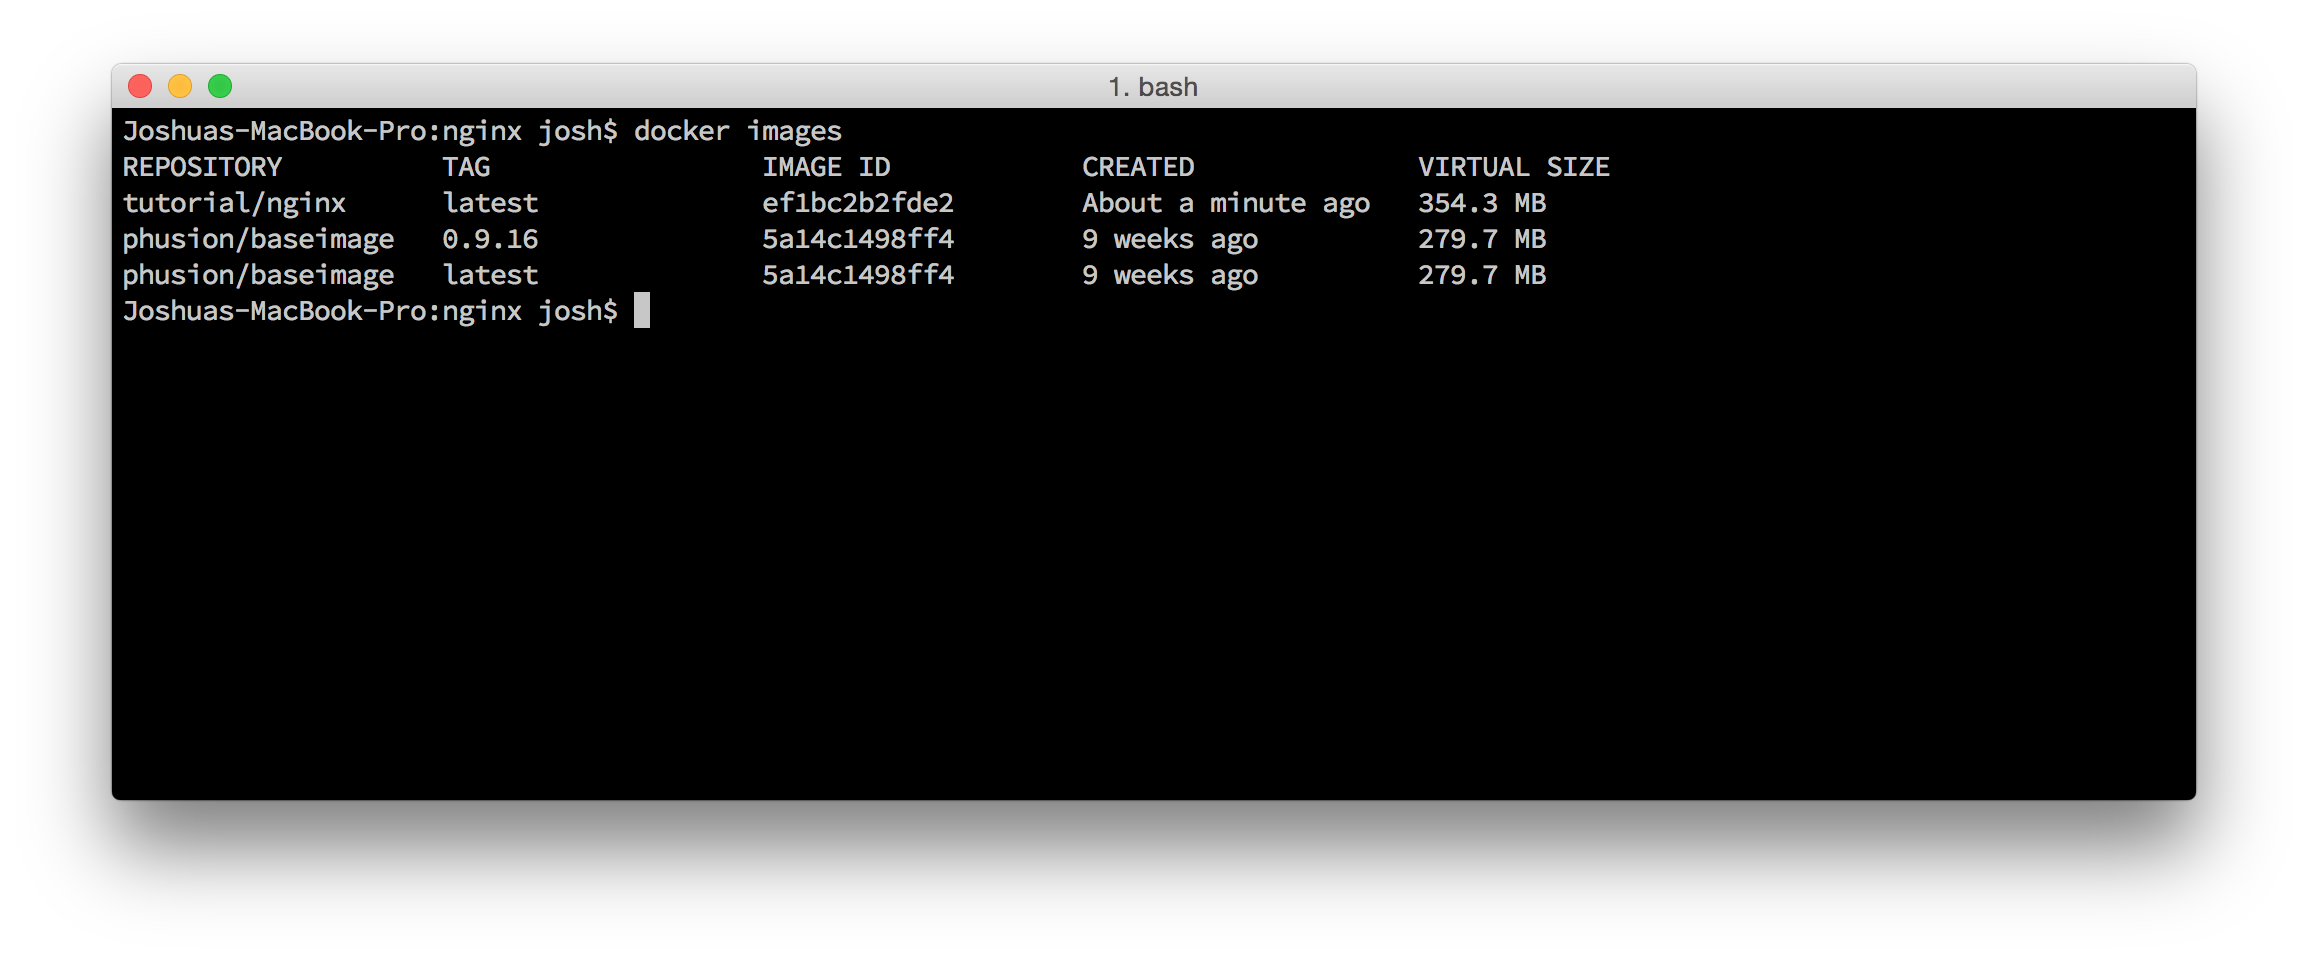 Docker image list
Congratulations! You've built your first Docker image. But remember, this is only a Docker image. It's helpful only if we use it to instantiate and run Docker containers. Before we do that, let's acquire Docker images for PHP-FPM and MySQL.
The PHP-FPM Docker Image
Our next concern is PHP-FPM. We won't build this Docker image. Instead, I've prepared a PHP-FPM image named nmcteam/php56, and it's available on Docker Hub. Execute this bash command to download the PHP-FPM Docker image from Docker Hub.
docker pull nmcteam/php56
The MySQL Docker Image
Our last concern is MySQL. I searched Docker Hub for a MySQL Docker image that extends the Ubuntu 14.04 base image, and I found sameersbn/mysql. Execute this bash command to download the MySQL Docker image from Docker Hub.
docker pull sameersbn/mysql
Application Setup
We now have all of the Docker images required to run our application. It's time we instantiate our Docker images into running Docker containers. First, create this directory structure beneath your project root directory.
src/
    public/
        index.html
The src/ directory contains our application code. The src/public/ directory is our web servers's document root. The index.html file contains the text "Hello World!"
Our application will be accessible at the docker.dev domain. You should map this domain to your Docker host IP address. If you run Docker natively on your Linux operating system, use the IP address of your own computer. If you rely on Boot2Docker, find your Docker host IP address with the boot2docker ip bash command. Let's assume your Docker host IP address is 192.168.59.103. You can map the docker.dev domain name to the 192.168.59.103 IP address by appending this line to your local computer's /etc/hosts file:
192.168.59.103 docker.dev
The Nginx Docker Container
Before we instantiate an Nginx Docker container, we need a virtual host configuration file. Create the src/vhost.conf file beneath your project root directory with this content:
server {
    listen 80;
    index index.html;
    server_name docker.dev;
    error_log  /var/log/nginx/error.log;
    access_log /var/log/nginx/access.log;
    root /var/www/public;
}
This is a rudimentary Nginx virtual host that listens for inbound HTTP requests on port 80. It answers all HTTP requests for the host name docker.dev. It sends error and access log output to the designated file paths (these are symlinks to the container's standard output and standard error file descriptors). It defines the public document root directory as /var/www/public. We'll copy this virtual host configuration file into our Docker containers during instantiation.
Execute the following bash command from your project root directory to instantiate and run a new Nginx Docker container based on our custom tutorial/nginx Docker image.
docker run \
    -d \
    -p 8080:80 \
    -v $(pwd)/src/vhost.conf:/etc/nginx/sites-enabled/vhost.conf \
    -v $(pwd)/src:/var/www \
    tutorial/nginx;
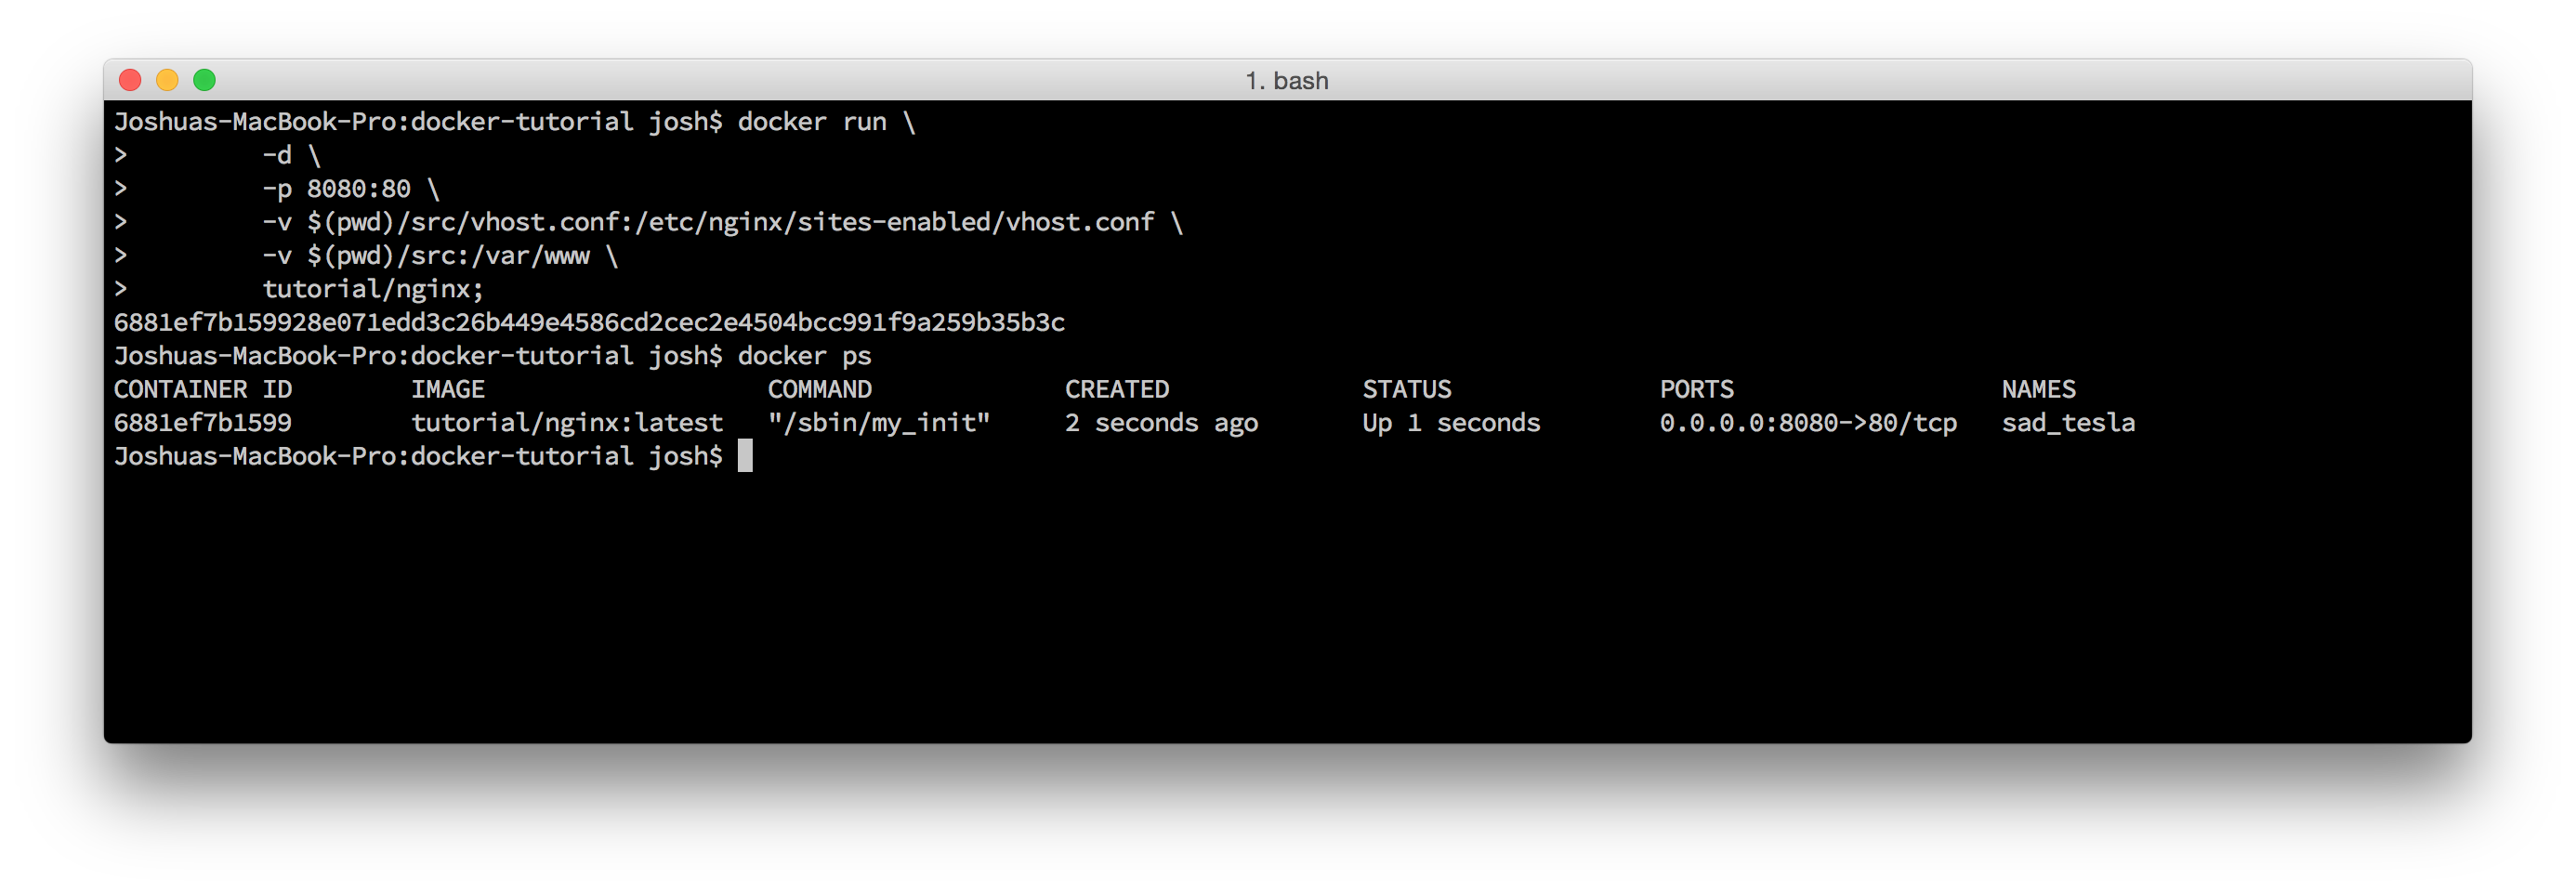 Start Nginx Docker container
We use the -d flag to run our new Docker container in the background.
We use the -p flag to map a Docker host port to a container port. In this case, we ask Docker to map the Docker host (port 8080) to the Docker container (port 80).
We use two -v flags to map local assets into the Nginx Docker container. First, we map our application's Nginx virtual host configuration file into the container's /etc/nginx/sites-enabled/ directory. Next, we map our project's local src/ directory to the Nginx container's /var/www directory. The Nginx virtual host's document root directory is /var/www/public. Coincidence? Nope. This lets us serve our project's local application files from our Nginx container. The final argument is tutorial/nginx—the name of the Docker image to instantiate.
You can verify the Nginx Docker container is running with the docker ps bash command. You should see the tutorial/nginx container instance in the resultant container list. Open a web browser and navigate to http://docker.dev:8080. You should see "Hello World".
 Nginx Docker website
Find the Nginx Docker container ID with the docker ps command. Then stop and destroy the Nginx Docker container with these bash commands:
docker stop [CONTAINER ID]
docker rm [CONTAINER ID]
Docker Compose
Unless you live and breathe the command line, the docker run ... bash command above is probably a magical incantation. Heck, even I have trouble remembering the necessary Docker bash command flags. There's an easier way. We can manage our application's Docker containers with Docker Compose.
Instead of writing lengthy and confusing bash commands, we can define our Docker container properties in a docker-compose.yml YAML configuration file. After you install Docker Compose, create a docker-compose.yml file in your project root directory with this content:
web:
  image: tutorial/nginx
  ports:
    - "8080:80"
  volumes:
    - ./src:/var/www
    - ./src/vhost.conf:/etc/nginx/sites-enabled/vhost.conf
Our docker-compose.yml file defines an Nginx Docker container identical to the Docker container we ran earlier: it instantiates the tutorial/nginx image, it maps host port 8080 to container port 80, and it mounts the /src directory and /src/vhost.conf file to the container's filesystem. This time, however, we define the Nginx Docker container properties in an easy-to-read configuration file.
Let's start a new Nginx Docker container using Docker Compose. Execute this bash command from your project root directory:
docker-compose up -d
This instructs Docker Compose to instantiate the containers defined in our docker-compose.yml configuration file, and it detaches the containers so they continue running in the background. You can execute the docker ps bash command to see a list of running Docker containers.
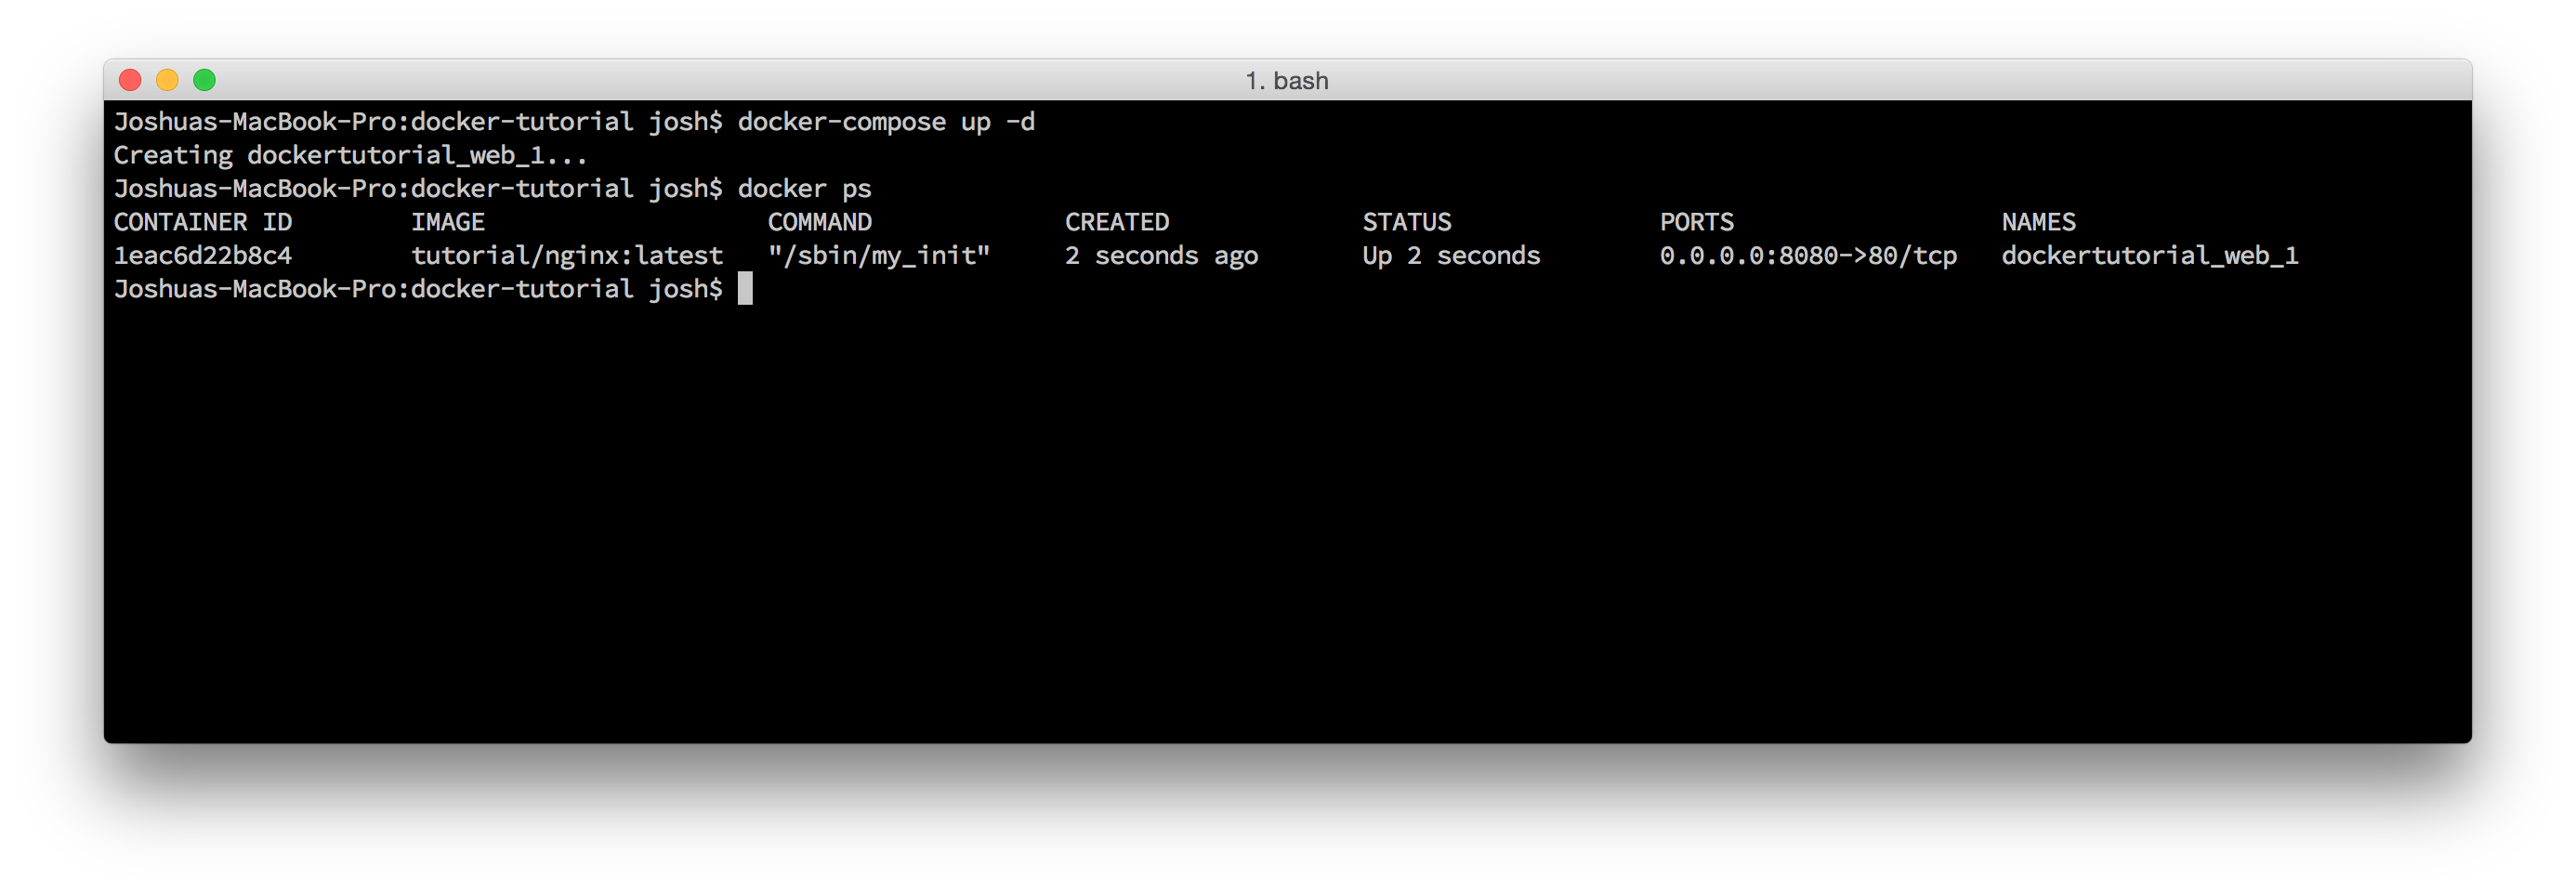 Docker Compose Nginx container
Refresh http://docker.dev:8080 in your web browser, and you'll again see "Hello World!" Keep in mind, Docker Compose is overkill for a single Docker container; Docker Compose is designed to manage a collection of related containers. And this is exactly what we explore next.
The PHP-FPM Docker Container
Let's prepare our PHP-FPM Docker container. Append these properties to the docker-compose.yml configuration file.
php:
  image: nmcteam/php56
  volumes:
    - ./src/php-fpm.conf:/etc/php5/fpm/php-fpm.conf
    - ./src:/var/www
First, we define a new Docker container identified by the php key. This container instantiates the nmcteam/php56 Docker image that we downloaded earlier. We map a local src/php-fpm.conf file into the Docker container. If you want to provide a custom php.ini file, you can also map a local src/php.ini file the same way.
Create the local src/php-fpm.conf file beneath your project directory with the content from this example PHP-FPM configuration file. This file instructs PHP-FPM to listen on container port 9000 and run as the same user and group as our Nginx web server.
If we were to run docker-compose up -d right now, we'd have an Nginx container and a PHP-FPM container. However, these containers would not know how to talk with each other. Docker Compose lets us link related containers. Update the Nginx container properties in the docker-compose.yml file so they look like this:
web:
  image: tutorial/nginx
  ports:
    - "8080:80"
  volumes:
    - ./src:/var/www
    - ./src/vhost.conf:/etc/nginx/sites-enabled/vhost.conf
  links:
    - php
The last two lines are new, and they let us reference the PHP-FPM Docker container from the Nginx Docker container. These two lines instruct Docker to append new entries to the Nginx container's /etc/hosts file so we can reference the linked PHP-FPM Docker container with "php" (the container key specified in the docker-compose.yml configuration file) instead of an exact (and dynamically assigned) IP address.
Let's update our Nginx web server's configuration file to proxy PHP requests to our new PHP-FPM Docker container. Update the src/vhost.conf file with this content:
server {
    listen 80;
    index index.php index.html;
    server_name docker.dev;
    error_log  /var/log/nginx/error.log;
    access_log /var/log/nginx/access.log;
    root /var/www/public;

    location / {
        try_files $uri /index.php?$args;
    }

    location ~ \.php$ {
        fastcgi_split_path_info ^(.+\.php)(/.+)$;
        fastcgi_pass php:9000;
        fastcgi_index index.php;
        include fastcgi_params;
        fastcgi_param SCRIPT_FILENAME $document_root$fastcgi_script_name;
        fastcgi_param PATH_INFO $fastcgi_path_info;
    }
}
Notice how the second location {} block's fastcgi_pass value is the URL php:9000. Docker lets us reference the linked PHP-FPM container with the "php" name thanks to the Docker-managed /etc/host entries.
Next, create a new src/public/index.php file beneath your project directory with this content:
<?php
phpinfo();
Run docker-compose up -d again to create and run new Nginx and PHP-FPM Docker containers. Open a web browser and navigate to http://docker.dev:8080. If you see this screen, your Nginx and PHP-FPM Docker containers are running and communicating successfully:
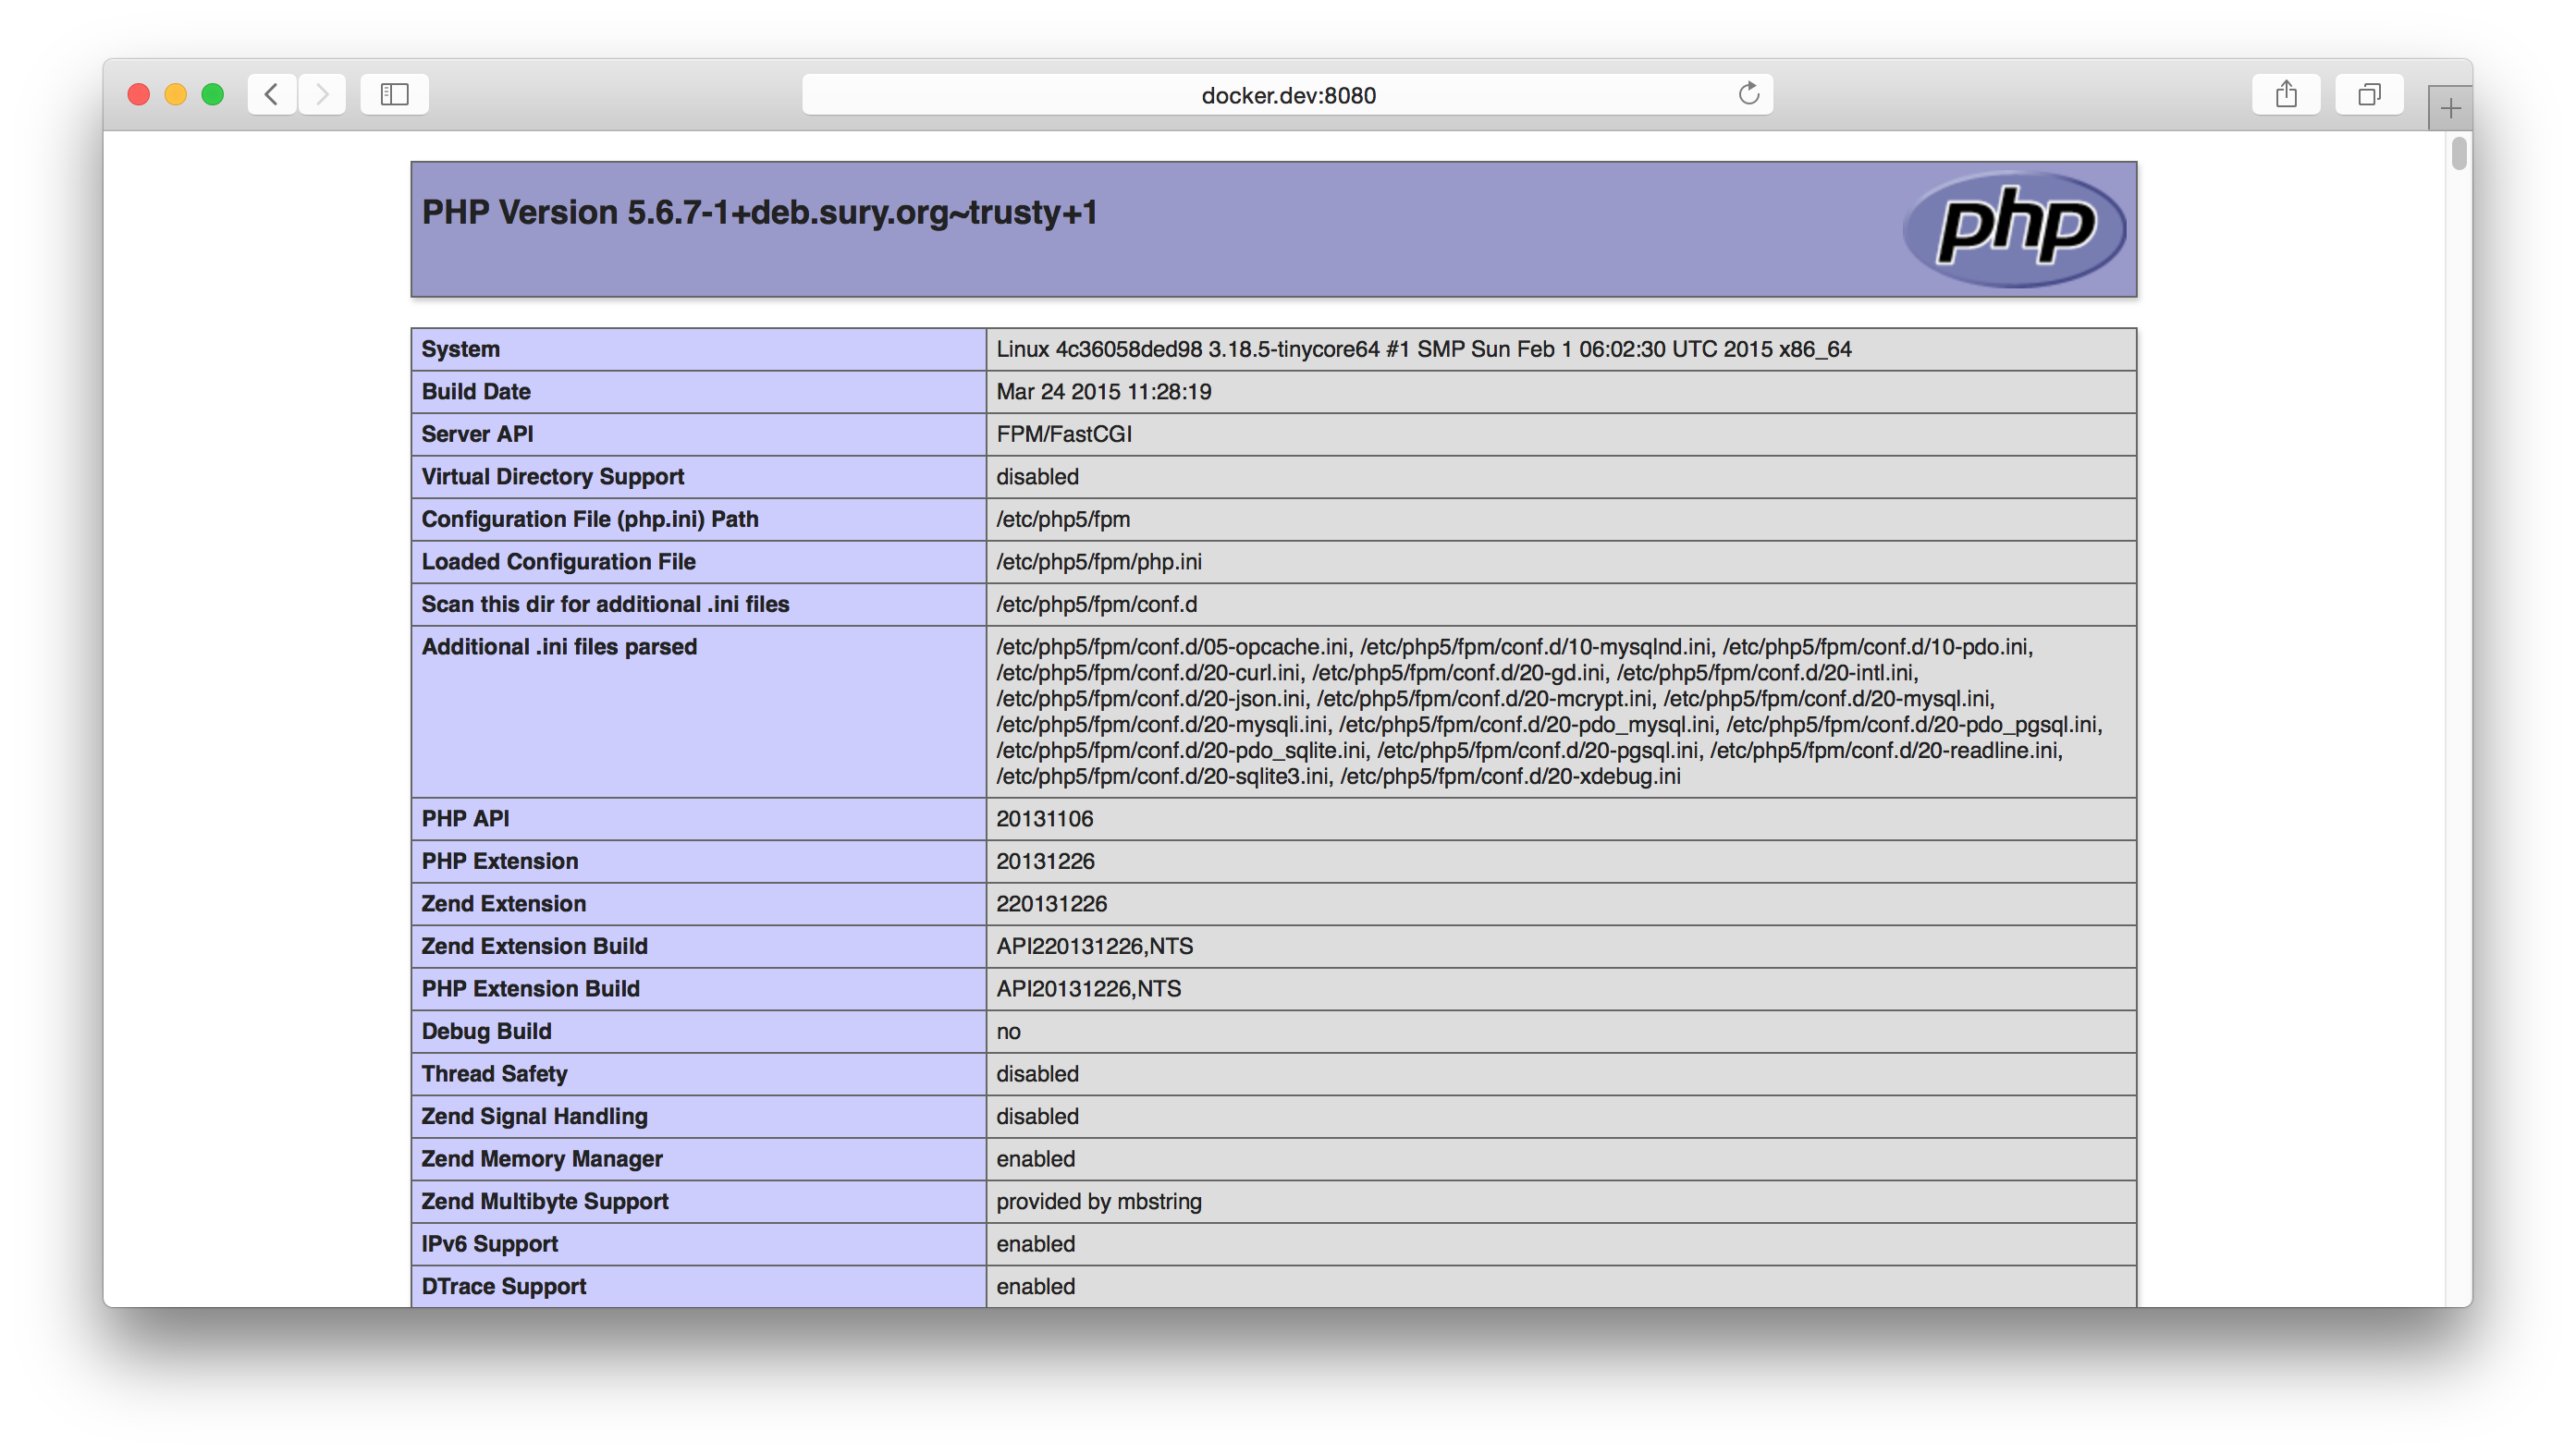 PHP Info
The MySQL Docker Container
The last part of our application is the MySQL database. This will be a linked Docker container, just like the PHP-FPM container. Unlike the PHP-FPM container, the MySQL container persists data using Docker volumes.
A Docker volume is a wormhole between an ephemeral Docker container and the Docker host on which it runs. Docker effectively mounts a persistent filesystem directory from the Docker host machine to the ephemeral Docker container. Even if the container is stopped, the persistent data still exists on the Docker host and will be accessible to the MySQL container when the MySQL container restarts.
Let's create our MySQL Docker container to finish our application. Append this MySQL Docker container definition to the docker-compose.yml configuration file:
db:
  image: sameersbn/mysql
  volumes:
   - /var/lib/mysql
  environment:
   - DB_NAME=demoDb
   - DB_USER=demoUser
   - DB_PASS=demoPass
This defines a new MySQL container with key db. It instantiates the sameersbn/mysql Docker image that we downloaded earlier. Our Nginx and PHP-FPM definitions use the volume property to mount local project directories and files into Docker containers (you can tell because they use a : separator between local and container filesystem paths). The MySQL container, however, does not use a : separator. This means this particular MySQL container path contains data that is persisted on the Docker host filesystem. In this example, we persist the /var/lib/mysql data directory so that our MySQL configuration and databases persist across container restarts.
The environment property is new, and it lets us specify environment variables for the MySQL docker container. The sameersbn/mysql Docker image relies on these particular environment variables to create a MySQL database and user account in each instantiated Docker container. For this tutorial, we create a new MySQL database named "demoDb", and we grant access to user "demoUser" identified by password "demoPass".
We must link our PHP-FPM and MySQL Docker containers before they can communicate. Add a new links property to the PHP-FPM container definition in the docker-compose.yml configuration file.
php:
  image: nmcteam/php56
  volumes:
    - ./src/php-fpm.conf:/etc/php5/fpm/php-fpm.conf
    - ./src:/var/www
  links:
    - db
After we run docker-compose up -d again, we can establish a PDO database connection to our MySQL container's database in our project's src/public/index.php file:
<?php
$pdo = new \PDO(
    'mysql:host=db;dbname=demoName',
    'demoUser',
    'demoPass'
);
Notice how we reference the MySQL container by name courtesy of the Docker-managed /etc/host entries. I know many of you are probably asking how do I load my database schema into the container? You can do so programmatically via the PDO connection in src/public/index.php, or you can log into the running Docker container and load your SQL schema via the MySQL CLI client. To log into a running Docker container, you'll need to find the container's ID with the docker ps bash command. When you know the Docker container ID, use this bash command to log into the running Docker container:
docker exec -it [CONTAINER_ID] /bin/bash
Now you can execute any bash commands within the running Docker container. It may be helpful to mount your local project directory into the MySQL Docker container so you have access to your project's SQL files inside the container.
Docker Logs
Once your Docker containers are running, you can review an aggregate feed of container log data with this bash command:
docker-compose logs
This is an easy way to keep tabs on all of your application containers' log files in an aggregate real-time feed. This is also why we direct each container's log files to their respective standard output or standard error file descriptors. Docker intercepts each container's standard output or standard error and aggregates that information into this feed.
Summary
That's all there is to it. We know how to build a unique Docker image. We know how to find and download pre-built Docker images from Docker Hub. We know how to manage a collection of related Docker containers with Docker Compose. And we know how to review aggregate container log data. At the end of the day, we have an on-demand PHP development environment with a single command.
You can replicate this setup in new projects, too. Just copy the docker-compose.yml configuration file into another project and docker-compose up -d. If you are running multiple applications simultaneously, be sure you assign a unique Docker host port to each project's Nginx container.
This tutorial only scratches the surface. Docker provides many more features than those mentioned in this tutorial. The best resource is the Docker documentation and CLI reference. Start there. You can also find Docker-related talks at popular development conferences or on YouTube.
- https://docs.docker.com/
- http://boot2docker.io/
- https://hub.docker.com/
- https://github.com/phusion/baseimage-docker
- https://twitter.com/docker
If you have any questions, please leave a comment below and I'll try my best to help.



Comments
olidev
Deploy a php app on docker (https://www.cloudways.com/blog/docker-php-application/ ) is easier and quicker if you are using server provisioning tools. If your server already has stack installed and configured, you just have create docker-compose and two dockerfiles.Snauwaert Simon
run apt-get update && apt-get install -y python-software-properties returns with a unknown instruction error.html Any ideas of where I am going wrong?Fabien Snauwaert
If ever you fail to connect to the server, a very stupid mistake: make sure you did start the server from the project's directory (and not from, say, `images/nginx`.)Simon Perdrisat
I did a blueprint, ready to use for php local development with docker: https://github.com/gagarine/docker-phpMy setup use unison for dual-side code synchronization to avoid performance penalty on OSX. Hop it can help.
don
Hi,I am trying to build the images you describe in your article, but I am getting an error with the first step of building the nginx image.
Step 4. run apt-get update && apt-get install -y python-software-properties returns with a unknown instruction error. Any ideas of where I am going wrong?
Thanks
Andy
When I try to bring the image up I get a repeated "file not found" error. I'm deliberately not daemonizing the run so that I can see the output, as below:$ docker run \
> -p 8080:80 \
> -v $(pwd)/src/vhost.conf:/etc/nginx/sites-enabled/vhost.conf \
> -v $(pwd)/src:/var/www \
> tutorial/nginx;
*** Running /etc/my_init.d/00_regen_ssh_host_keys.sh...
*** Running /etc/rc.local...
*** Booting runit daemon...
*** Runit started as PID 7
: No such file or directory
Aug 13 16:44:31 efa47b00b2de syslog-ng[13]: syslog-ng starting up; version='3.5.3'
: No such file or directory
Emmanuel
A very complete article, with all useful information. The problem with docker is that you need hours of practice to setup a small dev environment. Maybe you could be interested by what we have done to avoid that : a lamp stack (like tutumcloud but that lets you chose your services): https://github.com/inetprocess/docker-lampI would be very happy to have your feedback about that !
Thanks
Emmanuel
liupeng
Hi,i have a problem.I used docker 1.12.0 with mac.I bind the docker.dev with 127.0.0.1. When I run "docker run \-d \
-p 8080:80 \
-v $(pwd)/src/vhost.conf:/etc/nginx/sites-enabled/vhost.conf \
-v $(pwd)/src:/var/www \
tutorial/nginx;
",and I can't open the url.It reports "Internal Server Error".I don't know how to solve it.Can you help me? Thanks
Sumitra Bagchi
This tutorial is very useful to me. But can you tell me that when you created volume you specified a path for .conf file, how you determine the location in the container ?Salim
In windows the docker container gets messed up due to line endings. When running docker build -t tutorial/nginx . or docker pull, git will convert the line endings from unix format to windows. This gives trouble because docker containers run on a linux VM when on windows. I had to convert the line endings of the start.sh file and others to Unix in order to run it. Moreover I also had to run the following command to prevent git from converting line endings when pulling from a remote repo.git config --global core.autocrlf false
Be careful when using this configuration because it can mess up your project git repos if your editor uses windows line endings. I use SublimeText and installed a plugin to make sure that line endngs of files are set to Unix by default.
Vikash Pathak
Hi Josh,Great article - love it, really helpful for beginners.
Bastian
Hi, Why do you need to add the content of the app to both nginx and php-fpm containers for fpm example? shouldn't nginx redirect requests?Adrian
The folder creation images/nginx/ mentioned in your article, is it in docker host or a folder in local host shared with docket host ?Stefan
Hey Josh!Thanks for the tutorial!
I keep getting «ERROR: for php rpc error: code = 2 desc = "oci runtime error: could not synchronise with container process: not a directory"» when I try to docker-compose up -d. It's because of the php-fpm.conf directory, but I cannot figure what's wrong with it all. Must've spent 8h on it by now - guess I'm a newbie, but do you have any idea what's going on?
At first I've tried setting it up using php-fpm 7 and I though that was the problem. Finally, I've used the exact same files as you instructed, but I'm still getting that error. I'm on Os X, but I don't think that matters.
Thanks,
Stefan
Foo
This article should be one of the official docker tutorials. Thanks mate.Jamie Jackson
As others have mentioned, this tutorial doesn't work out-of-the-box, as it has some minor errors. It also doesn't work out-of-the-box on Windows, for other reasons.I've incorporated the information from the comments, modernized it to use docker-machine instead of direct boot2docker commands, and have made some other tweaks (just enough to get it working), as well.
https://github.com/jamiejackson/nmc_docker_tutorial
Mahmoud Zalt
Without all that hassle I use LaraDock it's great alternative to run Laravel on Docker in seconds! https://github.com/LaraDock/laradockJordan
# Josh LockhartThank you so much for this great tutorial! It helped to understand docker and how simple it could be.
Really aprecciated
#Bertrand GAUTHIER
Thanks for show us typo. I was about to start again... when decided to check comments.
Benny
thanks alot i will try this. I really want to learn docker. Thanks againSaeed
very nice article, only one thing is missing, that would be very helpful.no complete files of code, would be nice if you also share complete code on github
Thanks
Michael
Nice article!But it there some way to create a database schema on MySQL container automatically by using Docker Compose?
For example by adding a path to .sql file inside docker-compose.yml ?
Web Animation India
Your Articles is very nice.Michael Favia
@Richard: I believe that the error you are getting ("System error: not a directory") is a bit of a known issue with the virtualbox solution that docker is using. If you just stop and restart the docker virtual machine you should see it disappear.John
Hey Jonathan,Thanks for this quick qnd easy tutorial, but I was wondering : Is there any reason you didn't use the official nginx, php and mysql images?
John
mloureiro
Hi guysFirst of all thanks a lot @Josh for the great post. I was looking for a simple tutorial to go from docker to multiple containers through docker-compose!
But I'm having the same issue that @Richard had `System error: not a directory`
This is happening on the php-fpm link, here:
- ./src/php-fpm.conf:/etc/php5/fpm/php-fpm.conf
But I have no idea, how to debug this, can someone point me in the right direction?
Thanks
Graham
For nginx version 1.8.0 there's an error with the nginx vhosts.conf file in your example. The bit where you have:location / {
try_files $uri /index.php?$args;
}
The block definition needs to be "location = /"
Christoph
Yes this helped a lot out of the confusion.I'm still confused about the common ubuntu base image.
And it would be a great to have the dockerfile of all the containers. I guess it would help to understand that.
The point of docker is to be able to build an environnement as near to the prod env as possible. There is more than enough "all in the box but not to the point" out there.
Thanks a lot.
Brice Bentler
Wow, really helpful stuff! You really cleared up a ton of confusions I had with docker compose and linking containers.Thanks again!
Steve Azzopardi
Is it possible for you to share the dockerfile for php56 please?Thanks
Richard White
Thank you very much for this concise quick start guide Josh. I'm trying to get xdebug running and need to plug in my own configuration values. I've tried modifying the docker compose file and overwriting the value in the PHP container. However I'm getting an error 'Could not start container [8] System error: not a directory'. What am I doing wrong?php:
image: nmcteam/php56
volumes:
- ./infrastructure/php-fpm.conf:/etc/php5/fpm/php-fpm.conf
- ./infrastructure/20-xdebug.ini:/etc/php5/fpm/20-xdebug.ini
- ./src:/var/www/salonlounge
links:
- db
Jeroen Sen
@Jonathan GoodmanAlso using Kitematic, Which actually does a pretty good job monitoring the individual containers. :)
However, regarding the preview option Kitematic automatically offers you from its GUI. Since the Nginx vhost.conf binds requests to 'server_name docker.dev' the preview doesn't work, this binds to the ip of the container. My suggestion would be either to remove this line from the vhost.conf (not tested!) or just ignore the preview.
romain
Hi,You really get my attention on Docker as i m always having hard with vagrant. But there one crucial step missing for my needs. How to a work / edit my source files from windows. I believe this is the "guess addition" dance but how to add it?
Klas-Henrik Adergaard
Somehow 'vagrant up' still seem a little more appealing to me, rather than getting the hang of the latest Docker changes. This article is in fact already obsolete. My point is just that Docker may be great, and compartmentalized virtualization of various components of any development process (and eventually deployment) is certainly the future, it still feels very early. The tools are still changing too much to make me more efficient in development.Thanks still for a great article.
Geo
Good and easy to follow article. A question though, is the Volume entry "- ./src:/var/www" needed on both the web and php configuration sections, or just in the php side?zenit
Great article. I also want to know how you prepare nmcteam/php56 :)If we create image for php-fpm based on phusion/baseimage we must add CMD ["/sbin/my_init"].
Also we must add something like CMD ["/usr/sbin/php5-fpm","-F","-R"]. But in Docfile must be only one CMD.
ilumin
How do you prepare nmcteam/php56 ?Ricardo Jacobs
This is a good beginners tutorial for newly users on Docker.The only thing you forgot was to expose port 9000 in the php part:
php:
image: nmcteam/php56
volumes:
- ./src/php-fpm.conf:/etc/php5/fpm/php-fpm.conf
- ./src:/var/www
links:
- db
expose:
- 9000:9000
Jonathan Goodman
Hi there,thanks for putting up a great tutorial on this. I've followed along but having some difficulty in the "The Nginx Docker Container" section. I'm sure if I'm placing the vhost.conf file in the right place. My application placed in my home directory:
`~/src/public/index.html`
I've placed the vhost.conf file here:
`~/src/vhost.conf`
I'm calling the command docker run command "as is" after cd'ing to ~/src/public
The issue I have it is that the webpage shows as unavailable.
I've checked my host file and believe it set right. I'm also using Kitematic which has a preview in browser option so it should just open the web page if everything's set up right. Leads me to believe its just my file placement thats off. Any feedback would be great. Thanks again.
SangHyok Kim
Hi, Mr Lockhart!Thank you very much for this kind tutorial.
I've done this tutorial on my mac os x and everything is ok, except one.
I've opened 3306 port of the mysql container and I connected to the database('demoDb') from my mysql client('mysqlworkbench').
I made some tables inside the db and close&removed the containers with successfully. (docker-compose stop, docker-compose rm)
But now, I can't find the saved mysql database files at my local storage.
I think the db files should be saved in '/var/lib/mysql' on my local storage, but this directory is empty now.
Would you please correct me please?
Thanks in advance.
Michael Oliver
That was a superb walk-through tutorial! In 30 minutes, you provided me with a clearer understanding of Docker than the past week of muddling through documentation. Thank you!JP Barbosa
Great tutorial, Josh!Like previous comment by Bertrand Gauthier, you just need to fix PDO database DSN to 'mysql:host=db;dbname=demoDb'. It would be nice to add some var_dump($pdo) to show that connection is working.
Max
* You forgot addexpose:
- 9000:9000
to php section
Max
I don't understand, PHP-FPM Docker Container must have own docker-compose.yml or i must add lines in general docker-compose.yml, like this:web:
image: maxgu/nginx
ports:
- "8080:80"
volumes:
- .:/var/www
- ./vhost.conf:/etc/nginx/sites-enabled/vhost.conf
links:
- php
php:
image: nmcteam/php56
volumes:
- ./php-fpm.conf:/etc/php5/fpm/php-fpm.conf
- .:/var/www
Peter DeChamp Stansberry
Thank you for saving me a headache!This tutorial got me up and running and it made all the past tutorials/videos come together for me with half the effort.
Anitha Raj
Thanks for this wonderful tutorial. It helped me to learn some new things docker. So thanks a lot.Bertrand GAUTHIER
Hi. Thank you so much for your cristal clear tuto.There is a little typo in the DSN argument of the PDO constructor call : it should be 'mysql:host=db;dbname=demoDb' and not 'mysql:host=db;dbname=demoName'.
Regards.
Rick Mason
Thanks for this. Easily one of the best walkthroughs I've seen for trying out Docker for PHP development.One thing I added is to expose the mysql container so I can access it using Navicat.
In the docker-compose.yml under the 'db' container definition add:
ports:
- "3306:33063"
Then you can use the 'boot2docker ip ' address and port 33063 to connect to the mysql server.
website design and development india
Since Docker Compose is not recommended for production, is it safe to assume the appropriate method for production would be using some kind of CI solution passing arguments to the commands for running the containers? For example, a build process that ran a bash script which would link the containers to one another?Boudewijn Geiger
Good job on this article. I really like the design of this website. Very clean and it reads very easily. Well done! To bad I discovered it a bit late when I almost have the same setup, but learned it all the hard way though hours of googling. Weird i just found this now. A thing I'm still struggling with though is how to use CLI tools (e.g. composer, artisan, phpunit or phinx) for my project. I found some interesting articles on using composer:- http://geoffrey.io/making-docker-commands.html
- http://marmelab.com/blog/2014/09/10/make-docker-command.html
In the two articles I just mentioned they create an abstraction on top of composer. Would like to know how you are using this.
All in all, I'm still not so sure about docker. I thought Docker should make my life as a developer easier, but in reality setting up my local development environment takes me way to long. Partially because I'm still insecure about what the "correct way" is to handle things. Before this I also used vagrant and generated a config with puphpet (https://puphpet.com/) which very easy to get a local setup working in a couple of minutes.
Also using boot2docker gives me some problems when mounting a volume for my database (mysql) persistence. I now use a data volume, to overcome that issue, but i don't find it ideal.
Josh Lockhart NMC team member
@Sylvain Thanks for the link! I'll research that approach and see what I can find out.@Steve That's where port mappings come into play. You can expose a container port to the docker host (a VM), and if necessary you could map the VM to your host operating system. This would let you communicate directly with the database from your host machine. This is just one solution. There are many ways you could solve this.
@Kenny It's not officially sanctioned for production work, but I've found it very stable so far. You'll have to research more about Docker in production without Compose. I think it's a messy landscape right now. That's why Compose is going to be so nice when it goes stable.
@mzkd Ubuntu is just my personal preference. Docker supports many other Linux distributions. The instructions in this tutorial are for Ubuntu. If you choose a different Linux distro, software installation will be different. But the process of building and instantiating containers remains the same.
Kenny SIlanskas
Since Docker Compose is not recommended for production, is it safe to assume the appropriate method for production would be using some kind of CI solution passing arguments to the commands for running the containers? For example, a build process that ran a bash script which would link the containers to one another?Sylvain
"However, Vagrant has one large downside—it implies hardware virtualization."You can use vagrant-lxc (https://github.com/fgrehm/vagrant-lxc) that basically allows you to use Linux containers instead of virtual machines, so you don't need any hardware virtualization.
Steve
Some of the things I can not understand is. Lets say using laravel how do I run my migrations with this setup.Another question that I have how to run my unit tests which are hitting the database and doing all sort of things? What i usaly do with homestead is just shh inside of it and run them from there.
mzkd
Hi Josh,Very interesting post about this great tool called Docker and how useful and lightweight it is to run some web projects...
I'm just fed up by Ubuntu has main engine of all servers... Recently, I really enjoy working with Fedora/Centos as web server, and discover very interesting features with Arch Linux (as a server too).
Do you think it could be the same pathes to setup a LEMP server with those OS, as you did with Ubuntu?
And I'm really in love with Slim to "handcraft" some of my web apps! When would you think you'll release v.3?
Have a nice day...
Simon
We have had some varied success with docker, on some systems it works and on others it doesn't work at all even when other vm's will due to some hardware constraint.Josh Lockhart NMC team member
Hi Luke. For the Nginx and PHP-FPM containers, we are mounting a directory on your own computer directly into the instantiated Docker container. This lets us work on and immediately serve files from your own computer through the Nginx and PHP-FPM containers. The MySQL Docker container is different because it does not mount from your computer into a container. Instead, it mounts a persistent directory on the Docker host into the running container. The only syntactical difference is "/local/path:/container/path" (mount local directory into container) versus "/container/path" (mount Docker host directory into container). When we only specify a container path as a container volume, Docker mounts a unique directory from the Docker host into the Docker container. We do this for directories that must persist across Docker container restarts (e.g., the MySQL data directory). Does this make sense?Luke
This is a great walkthrough but skips over something I'm not grasping yet. What's the difference between the volumes you are mounting for php-fpm/nginx and the one you use for mysql? How are these types of storage different? Is it just that mysql needs to write to a predefined system path so you need to mount a 'special' volume?Leave a comment